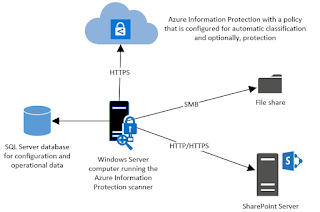
If you heard me talk I say many time we need to start classify our data so the we can protect the critical files and add additional security to those files that are at the highest risk.
We need to protect data based on the risk. You may have heard me talk About RMS (Right Management Service) or AIP (Azure information Protection). Here is an article on an tool that will help you find and automatically classify file for you.
This article is for the current general availability version of the Azure Information Protection scanner.
If you are looking for deployment instructions for the current
preview of the scanner, which includes configuration from the Azure
portal, see Deploying the preview version of the Azure Information Protection scanner to automatically classify and protect files.
Use this information to learn about the Azure Information
Protection scanner, and then how to successfully install, configure, and
run it.
This scanner runs as a service on Windows Server and lets you
discover, classify, and protect files on the following data stores:
- Local folders on the Windows Server computer that runs the scanner.
- UNC paths for network shares that use the Server Message Block (SMB) protocol.
- Sites and libraries for SharePoint Server 2016 and SharePoint
Server 2013. SharePoint 2010 is also supported for customers who have extended support for this version of SharePoint.
To scan and label files on cloud repositories, use Cloud App Security.
Overview of the Azure Information Protection scanner
When you have configured your Azure Information Protection policy
for labels that apply automatic classification, files that this scanner
discovers can then be labeled. Labels apply classification, and
optionally, apply protection or remove protection:
The scanner can inspect any files that Windows can index, by
using IFilters that are installed on the computer. Then, to determine
if the files need labeling, the scanner uses the Office 365 built-in
data loss prevention (DLP) sensitivity information types and pattern
detection, or Office 365 regex patterns. Because the scanner uses the
Azure Information Protection client, it can classify and protect the
same file types.
You can run the scanner in discovery mode only, where you use the
reports to check what would happen if the files were labeled. Or, you
can run the scanner to automatically apply the labels. You can also run
the scanner to discover files that contain sensitive information types,
without configuring labels for conditions that apply automatic
classification.
Note that the scanner does not discover and label in real time. It
systematically crawls through files on data stores that you specify, and
you can configure this cycle to run once, or repeatedly.
You can specify which file types to scan, or exclude from scanning.
To restrict which files the scanner inspects, define a file types list
by using Set-AIPScannerScannedFileTypes.
To learn more go Here
